Your prints are getting faded or of poor quality but you think your ink cartridges are not empty? Your printheads may have dried out. Indeed, if your cartridges are not used regularly enough, the ink can dry and thus deteriorate the quality of your prints.
To remedy this, you need to perform printhead cleaning which you can run through a program on your device or do manually.
Also Read: How to connect a Brother printer to WiFi
How to Clean Printer Heads Epson
Table of Contents
1 – First solution: automatic cleaning Printer Heads Epson & other models
This is the most common solution, to be tested as a priority. To find out how to start an automatic cleaning, we invite you first to refer to the instructions for your printer.
Most often you will be able to initiate the cleaning process either through your printer or directly through your computer. If you don’t have the instructions handy, see the most common procedures below to help you start cleaning if a printhead fails.
A printhead may require up to 4 cleanings in some extreme cases.
Also Read: Which Printer has the Cheapest ink Cartridges
Cleaning the printheads using a printer
Open the menu for your printer. Scroll through this menu and select ” configure ” then ” Maintenance ” or ” Ink “. You will then have access to the option ” Cleaning the print heads ” (or “Printhead cleaning”). Wait while cleaning and then do a test print.

Cleaning the Print Heads Using the Computer
Under Windows:
- Open the control panel
- In ” hardware and sound “, click on ” Printers and peripherals “
- Right-click on the affected printer
- Choose ” Properties ” then ” Cleaning “, ” Maintenance ” or ” Services ” depending on your model
- Start cleaning the printheads
- Wait while cleaning and then do a test print.
On Mac:
- Go to ” System Preferences “
- Select ” Printers and Faxes ” then choose the printer concerned
- Open ” Print queue” (or “Open print queue”)
- Click the icon of the service associated with the printer
- Select ” Maintenance ” then ” Printhead cleaning “
- Wait while cleaning and then do a test print.
Also Read: Cheapest Place To Buy Printer ink Online
2 – Second solution: manual cleaning
Despite several automatic cleaning attempts, you are not getting any real improvement in the quality of your prints? Try manual cleaning!

Some Precautions
Before starting to manually clean your printheads, here are some recommendations:
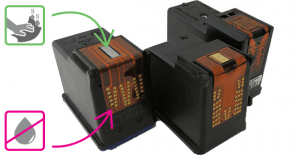
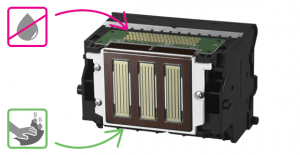
- Do these manipulations with gloves so as not to strain yourself
- Do not use alcohol, vinegar, or tap water
- Be careful not to touch the metal parts with your fingers
- Do not wet the circuit board on the printheads and cartridges
- Do not leave the printheads in the air for more than 30 minutes or they may dry out even more
Be very careful when handling so as not to damage your printing material.
Brands also recommend that you do these manual cleanings only when your printer is out of warranty.
Also Read: How long does printer ink last before it dries up
If the printheads are integrated directly into the cartridges
Carefully remove the cartridges from the printer and place them on absorbent paper
- Turn off the printer
- Dampen a soft, clean, lint-free cloth with warm distilled water
- Remove excess dry ink from the printheads without pressing too hard
- Place the cartridges in a container containing sheets of absorbent paper covered with a few millimeters of hot distilled water (printheads facing down)
- Leave to soak for 10 minutes and air dry for 15 minutes with the printheads facing up this time
- Put the cartridges back into the printer

Also Read: How to keep printer ink from drying out
If the printheads are built into the printer
Find out how to clean in this case!
- Carefully remove the cartridges from the printer and place them on absorbent paper
- Turn off the printer
- Carefully remove the printhead support (there is a handle/latch to lift, if not, refer to the next part)
- Dampen a soft, clean, lint-free cloth with warm distilled water
- Remove excess dry ink from the printheads without pressing too hard
- Place the print heads in a container containing sheets of absorbent paper covered with a few cm of hot distilled water (nozzles down)
- Leave to soak for 10 minutes and allow to air dry for 15 minutes with the nozzles facing up this time
- Put the printheads and cartridges back into the printer
Also Read: How to Clean a 3D Printer Bed
If the printheads are built into the printer and attached
If the printhead holder does not have a latch and therefore can not exit the printer, use the following steps to attempt to clean your machine manually.
Carefully remove the cartridges from the printer and place them on absorbent paper
- Turn off the printer
- Take a sheet of absorbent paper and fold it so as to obtain a rectangle 2 / 3cm high across the width of the absorbent paper
- Slide the absorbent sheet under the carriage at the part where the nozzles are located (this part is attached to the printer but it can be moved left to right and right to left)
- Dampen a soft, clean, lint-free cloth with warm distilled water
- Place a few drops of hot distilled water on the nozzles by wringing the cloth above the nozzles or using a pipette for example
- Wait a few minutes: the absorbent paper will prevent water from incorporating into the printer
- Remove the absorbent paper sheet then replace the cartridges in the printer
As the last step, repeat a printing test. If the quality has not improved, one of the ink cartridges may be too old or damaged and need to be replaced.

Conclusion:
well, This was all about “How to Clean Printer Heads of Epson (Automatically & Manual)” I hope you like my article.

